Wednesday, August 31, 2016

A Fan of Spray Paint

Judy here.  Just got home from San Antonio, to Amarillo, through rain storms, floods, and a 9 hour drive.  But as I drove, I thought about this blog and things I want to share.


For those of you who are not experienced at all with furniture re-dos, let me tell you that the easiest way to paint furniture is for outside.  Why? you ask.  Because for outside you can use spray, enamel paint (heavy on the fumes, so do it outside) which will make it weather well.  Using enamel based paint with a brush is hard because you have to have paint thinner to clean the brush (more fumes) and it takes time to clean those brushes, plus enamel shows brush strokes.  Even if I use poly or enamel paint, I'll usually finish with a layer of spray varnish or paint to fill in those brush strokes.


Rustoleum 2x in many colors and clear (gloss or satin) is my favorite.  They cost about 3.50 a can at Walmart, Lowes, Home Depot, etc.  Now if you really want to save money, Walmart has a brand (Tera says is good and I don't remember the name and it's usually on bottom shelf) for under $2. 


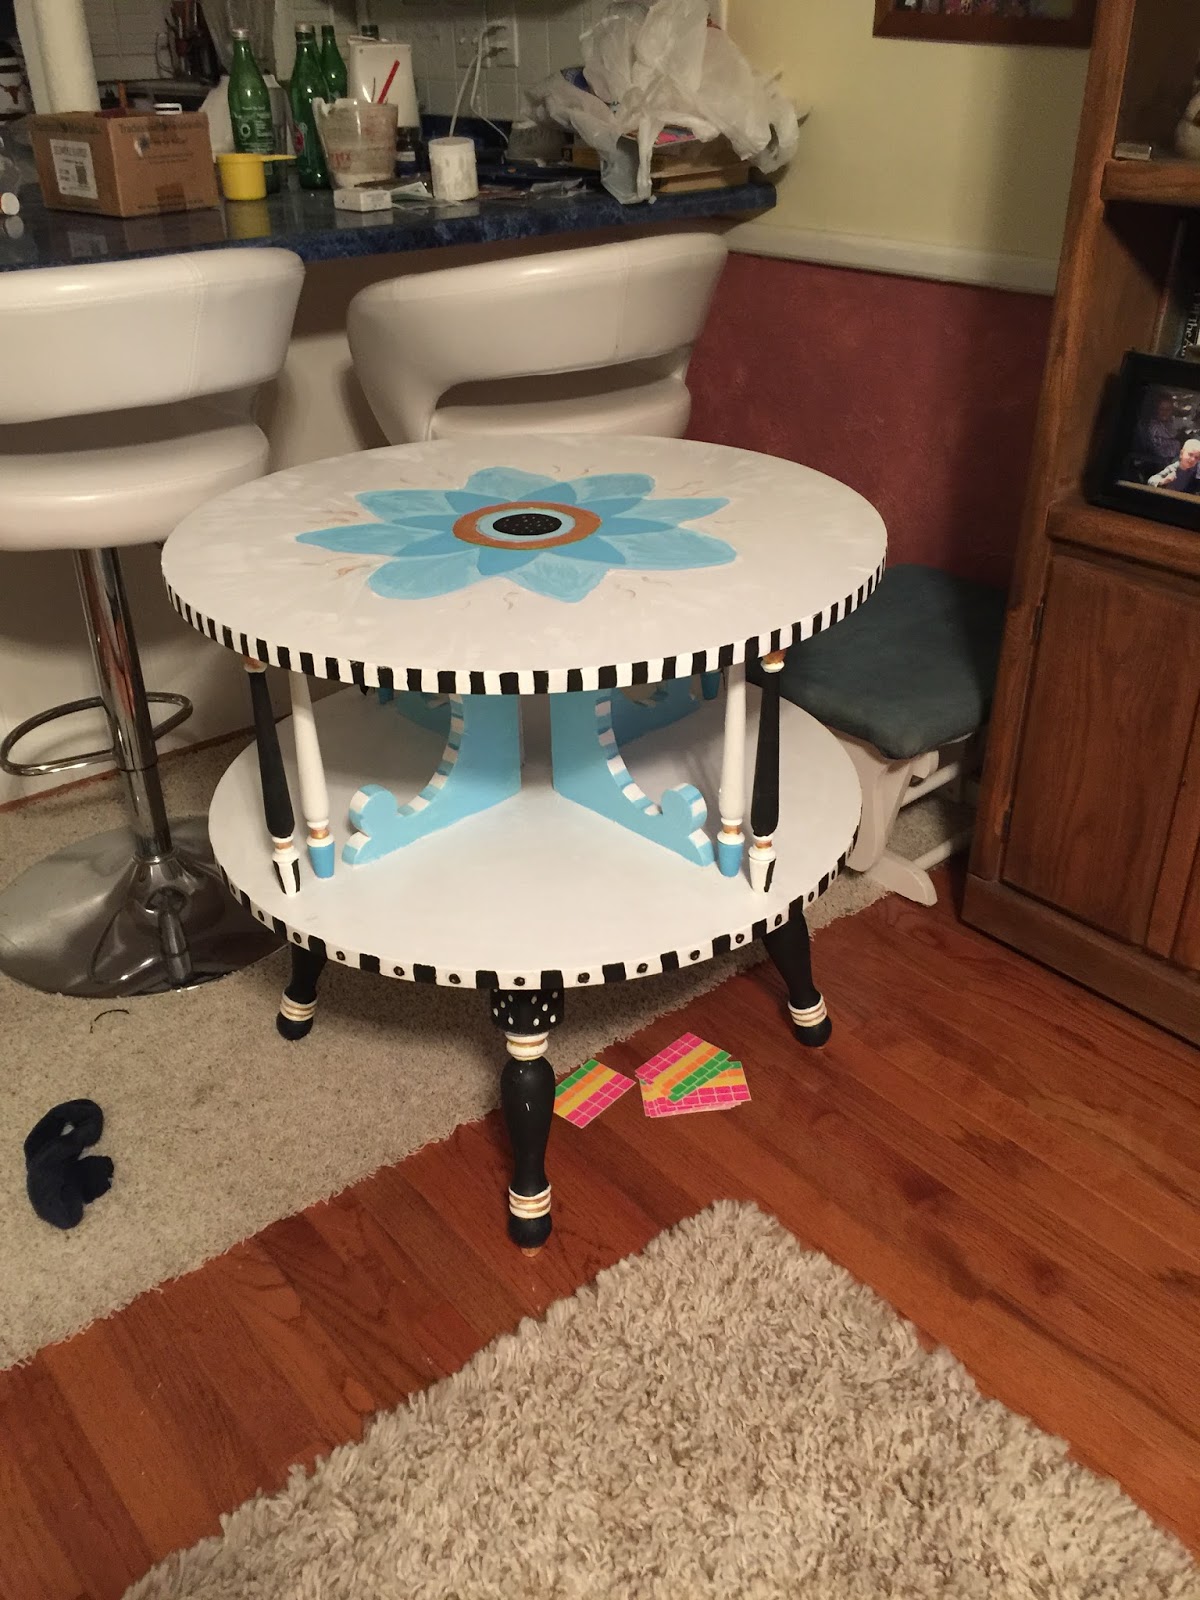
I recently did 3 chairs and a table for the sun porch, using 4 colors, one for each item separate, using the colors in the pillows to draw it all together.  I used 1 1/2 cans of paint per chair. 


Now on the lawn furniture I spread a drop cloth in the yard on the grass.  And I had to clean each chair a lot with the water hose, as they were really, really dirty and spider-web covered. I got the whole set including a lounger at a garage sale for $40. 
 On the first chair, I goofed and set it up as you sit in it and painted it, and after it dried flipped it upside down.  DO NOT DO THAT, because then you can ruin your fresh paint job!  So on chairs 2 and 3 and the table I started it upside down, and after dried flipped and did it as it sits.  After they dried I repeated those steps because I missed spots.  Usually I would then cover with clear gloss, but since these were staying in the screened in sun porch, I decided not to do that.
Dirty chair, as all were dirty.


  I then found 3 sets of pillows at Walmart on sale for $5 each and chose different sets with similar colors (Walmart was so sold out they didn't have 3 of any one pattern).  I tried to Velcro the backs to the chairs, but they were too heavy, so they just sit up on the bottom pillow. 


But back to the spray paint, be very sure to continually move the can around as you spray or it will go on too thick and run.  If it runs and you see it, grab a brush and spread it out while wet.  If you miss it and it dries, you might have to sand it down.  Sometimes I just peel it off with my fingers and lightly repaint those spots.  I like a back and forth movement, but Tera uses a squirt, move, squirt move, pattern.  I probably waste more paint in the back and forth and possibly get lines, but its my method, and its the same method my son uses when using a paint sprayer for walls. 


I have now done 3 outside sets.  I remodeled a home for an elderly couple a few years back and they had a park bench.  I spray painted those.  I also spray paint hardware.  Tera did the hooks on the coat tree from last blog; she also sprayed all the hardware on the kitchen cabinets on a house we flipped last year in San Antonio and the front doors on both San Antonio flip houses.  I sprayed hardware on the cabinets in the elderly couple's house.  It makes them look brand new.  It's amazing how style isn't the culprit on hardware, but color.  Right now nickel is hot.  In the 70's it was bronze.  Bronze screams 70's.  There are lots of things you can spray paint, and if you are just starting this hobby, start with spray paint.  Tera has done quite a few desks and they always look amazing.  More on those in the future, as Tera buys a lot of desks and filing cabinets from auctions and always makes them look fun, modern and colorful.  She did one filing cabinet with superheroes on each drawer.  But I'm sure she'll want to show you some of her work.  She probably won't write as often as me, as she is taking care of 4 boys, and one is only 2 (yes, terrible twos.  He's the size of a 5 year old but as active and inquisitive as a 2 year old!!) 


 I could probably go on and on about what all we've spray painted, but just know that it's easy, cheap and can make anything look better (remember the commercial where the lady buys the lawn chair and bike for next to nothing, spray paints it and resells it to the original owner for 10x what she paid.  Yes, it is true.  Rejuvenate with inexpensive spray paint, which dries super fast, and have a project done in a day.  I did all 3 chairs and table in 24 hours!!


So that's my fan letter to spray paint, especially Rustoleum. Hope you learned something and feel inspired to get out there and paint something old to make it young again.  

Tuesday, August 30, 2016

My Round Book Table.

Hello, ya'll.  Yep,, that's Texas for everyone, you all.  Judy here.


I was at the Women's Center, a set of stores for raising money to support women who are abused, one day and found a rolling book shelf which looked cool.  I bought it, brought it home and painted it as a zebra print wine cart. I'm using it today at my newest flip house in the corner of the living room.  But I enjoyed that so much, I went back to the Women's Center one day with my pick up and shopped their furniture area.  Everything is donated, so everything is used--usually dated too.


This particular day I had a ton of luck.  I found two end tables exactly like what my mom had in the living room while I was growing up.  One of these I painted as a little Diva table.  I'll post that project later.  I gave Tera the other one as she wants to make it a "block" table for her kids by putting a basket under the top shelf to hold the blocks and lower level be a building station.  I found an octagonal end table with lots of design.  I plan on making a cat house out of that, but for the time being it is living in my garage.  And the last item I bought was a piece I fell madly, hopelessly in love with.  Why?  I LOVE and COLLECT books.  I cannot stand the thought of a book being on the floor, going in a trash, etc.  This table is round, has dividers that divide the second level into four divisions, and I could just see it as a book table.  It sits up on scroll legs and I just knew FOLK ART paint was calling me, the kind with black and white checks and lots of colors.  After I flipped my first house in San Antonio (before that I worked mostly in Amarillo), I came home and attacked my staircase, living room and entry hall, while also working alternately on the round book table.  Here is what it originally looked like at the Women's Center


This is the table I made Diva and gave Tera one like it.


The first thing I did was scratch it up a little with my electric palm sander to take off the slick and make paint stick to it.  Then I used the last of my can of white chalk paint to give a rougher texture and cover some of the dark color. 


After it dried, I added over the next few days several coats of white semi gloss house paint.  My goal was to leave no sign of the brown and to have so many coats of paint it couldn't possibly chip off.  I was using Sherwin Williams interior semi gloss.  I keep cans of that in my house as I have white trim throughout and I'm constantly touching up. 


After I got all the white layers on that I wanted, then the creativity took over.  I set the table in my den across from where I sit and let it sit for several days as I looked at it while working and watching t.v. and trying to envision what I wanted.  I perused websites and blogs of other house furniture painters.  Under "My Favorites" on my computer,  I have saved The Decorative Paintbrush, a blog by two women who paint very colorful folk art designs on furniture for other people.  I can just get my artistic juices flowing looking at their pictures.  My studying similar legs, dividers, scrolls, etc., I can start getting a feel for what I want something to look like. 


I decided to work my way up from the bottom.  I decided that gold would be my shiny accent and that the legs would be black and white, alternating stripes, dots, etc.  I got these pattern ideas from The Decorative Paintbrush.  So I turned the table upside down on the kitchen counter and got out my acrylic art paints.  I get them for like $.89 a bottle at Michaels Craft Store.  I have a collection of brushes from micro tiny to tiny, to graduating upward in size.  My daughter Tera and I use to own a ceramic paint studio and I still have some of the brushes from that store.  I use a lot of blue masking painter's tape to keep lines straight and not bleed into areas I don't want painted.  Remember, acrylic will wash off if you hate what you paint, or its easy to paint over it.  As you will see from the pictures below, that I finished the legs and moved up to the dividers in the table. 


 I'm a blue person; most cars and house design I own is blue, so it should come as no surprise that I decided to do baby blue dividers.  The edges I did in stripe. I use little sticky notes from Office Depot to create the areas that will stay white.  On polka dots, I put little tiny sticky dots on the legs and painted over that area with black acrylic and then pulled off the stick dots to reveal white dots.  The gold between the scrolls of the legs was paint pens from Michaels.  On the bottom of the table is a straight area that I did stripes in two shades of blue, that remind me of a circus tent.  I just hand paint those by doing the whole area with the light blue and then taking a brush and painting downward stripes using another brush of the same size dry to mark where each stripe starts.  This is no exact painting, but the mistakes makes it more whimsical. 


 Next I did the posts between the shelves.  I decided to do exterior posts black with some gold trim, and interior posts leave white with black and blue trims.  You can use painter's tape for masking off what you don't want painted.  Also I used gold paint pen for tiny lines.  After I finished the posts I did a black and white checkered design around both shelf edges and around the edge on top of the table to make a frame.  I think it looks like a circus tent for sure now.  I put stickem strips on the edges to keep the white/white, and painted between them the black.  On the bottom shelf edge I added a black dot in the middle of the white squares to distinguish it from the top shelf.  I probably put three coats of black on the black squares to be sure its filled completely. Plus when I remove the stickems, I usually have to straighten the lines


 Sometimes I paint something like the bottom of the black posts with stripes and later decide I don't like them and change them.  So finished product may end up looking different.


After I finished the stripes I used dishes to make circles in the middle of the top of the table to form the interior of a large flower and then hand painted the flower and used acrylic mixed paints to make the petals


 After the creativity part is over, then I applied a layer of spray polyurethane. I used Rustoleums 2x Gloss which I buy at Lowes for about $3.50.   This seals that acrylic paint so that it won't run when wet and wash off.  After that dried I applied several layers of liquid polyurethane. This comes in a quart or gallon size.  I like gloss and not satin.  A quart will last a long time and do many pieces of furniture.  I buy it by the gallon when using it on flips to seal over wallpaper and do floors.  Any brand works, but be sure you are well ventilated when applying poly whether spraying or brushing as the fumes are very strong.  Also try to find some that's washable with water for your brushes or you will have to have paint thinner to clean your brushes.  If I had done this first, the acrylic would have smeared from the brushing, but the spray layer set and protected the artwork, and the three coats of liquid brushed on makes the table really, really shiny, like glass and very protected from being used by kids.  I have this setting now in front of my bay window in the dining room and it houses my grandkids blocks and books, etc.  I'll remove it at Christmas for the tree, but I just love it setting there in my "country print" dining room (which was another project). 

This was final picture with urethane applied before set on wood floor in dining room.


 By the way, I work from home a lot, so I have a printer now setting on the flower.  Oh, well, this table is doing double duty, holding a printer and housing toys and books.  As an afterthought, let me encourage you to be very, very diligent in washing your brushes.  I imagine I used up to 8 or 9 on this project and if I had not washed in between they would dry and ruin and you'd have to buy more.  This gets expensive.  I am very motivated in all projects to clean up immediately even between steps all materials, as they are costly and it is ridiculous to let good materials ruin because someone is lazy. 


Well this ends our first project post.  Hope you enjoyed it, and see you next time


Monday, August 29, 2016

Welcome!

Welcome to our New Blog, A Tale of Two Flippers!

We would love to introduce ourselves and explain what our blog is about!

About us:
Our names are Judy & Tera, we are a mother and daughter who love crafts and making other people's "junk" into our treasures!  We work together as a Real Estate team in the San Antonio, Texas area! (Go Spurs Go!)  Another job/passion of ours is flipping houses together!

About Judy:
 I am a mother, grandma, house flipper, realtor, furniture redoer, crafter, artist, ex-teacher, ex-coach, ex lots of things, and Wife.  I spend half my time in San Antonio doing all of the above, and half the time in Amarillo being a wife and mother and grandma and landlord (ugh).  My joy in life is my 5 grandsons, 1 granddaughter, 2 sons and lovely partner and daughter.  I have been married to my hubby for 11 years, and we live in a 1960's house that's grown and grown to this enormous monster of 3300 sq ft plus 6 spaces of garage (which houses lots of furniture! go figure).  My home even has a "bomb shelter" used mostly for neighborhood tornado hidey hole.  As an ex-teacher I love to share my flips and projects with everyone and show them how to do it themselves - hence this new blog.  I have several other blogs:  momsdementia.com or WalkingMomThroughDementia.blogger.com which details the long struggle my Mom endured until her death in 2013.  It tells her life story, research I found, and my daily visits with her.  I have over 85,000 page views on that blog and even have had two doctors write and tell me that my research helped them.  That validates to me the need for such a blog.  My second one is WhatsUpWithRealEstate.blogger.com.  I guess that's self explanatory.  I hope you enjoy this new blog and feel free to let us know how we are doing.

About Tera:
Hey Ya'll!  My name is Tera and I am Texas born and raised.    I have been married for 13 years to my husband. We moved from Amarillo to San Antonio about 8 1/2 years ago.  We love it here!  We have 4 amazing boys, yes all boys....I know right?!  My house is loud and can sometimes be confused as a gym or a playground but it is full of love and fun!  I am new to the blog world but I am excited to share my love of real estate, crafts, refinishing furniture, and most importantly flipping houses! I decided to go in to real estate during the crash in 08-09 (smart right?) but I decided if I could make it during the bad times then I could make it through the good times!  Before real estate, I worked many different kinds of jobs: post office, college bookstore, freelance writer for a newspaper, etc but I love real estate and I love writing so a blog seemed like a good combination! I hope you enjoy our blog and that it can bring a smile to your face!

About our Blog:

Our blog is going to be about the houses we flip and the humorous and frustrating situations that we find ourselves in everyday!  We also will have individual posts on side projects that we have been working on!  We hope by sharing our experiences we can give you great information on real estate, how to and what not to do on house projects, and maybe give you some fun ideas for your own projects!

Some of our projects include desks, filing cabinets, coffee tables, side tables, bookshelves, and recently we are working on a coat tree.

Let's hear from you which of these projects might interest you the most, and we'll start with your choice to show step by step how we did it, what products were used, and mistakes we made.