Showing posts with label polyurethane. Show all posts

Monday, September 19, 2016

Zebra Drink Cart

The zebra bar cart used as staging that I will tell you about in this blog.  This fireplace was a solid white when I bought the house, and the floor was blonde laminate,  yellow walls now gray with new texture and new 5 inch baseboard.  This is what I do for $$.
 

Judy here again.  I've been busy on a project this week, making a cat house/bed out of a hexagonal side table. HOWEVER, that is not what this is about. 

A few years ago, I discovered that the Ladies Center here in Amarillo takes donated furniture, clothes, baby supplies, art, purses, lamps, almost anything, and sells them really cheap.  I forget what I went in looking for, but I found a cute little book cart.  I had been watching Flea Market Flip a lot, and I had seen a lot of bar carts being made out of lots of different pieces of furniture, and when I saw that book cart, I thought:  bar cart.  Not that I needed one, as I don't drink; but I knew it would work for staging (and I'm using it right now in my house in San Antonio that's for sale) or I might sell it. 

I also knew that I had been wanting to do something in zebra print.  I found a small zebra painting on line, and got myself a canvas and practiced doing a zebra print on it, and yes, I could paint zebra print.

Needless to say, I bought the book cart, and took it home. 


As you can see it was wood and brown.  This was my first attempt at chalk paint.  I bought white at Michaels and started painting the book cart.  The reason I chose it was that it said you would NOT have to sand, and if there is one thing I hate doing, it is sanding.   Let me tell you that it was not a good experience for me.  I hated it.  I hated the look it created, all bumpy, dull and looked as if it needed sanding, which defeated my purpose of using it.  I read online that you are suppose to buy a wax to put on it, and I didn't feel comfortable with that.

So I lightly sanded the chalk paint which I had put 2 coats of on the book cart, and I then repainted it with my  white semi gloss paint I keep on hand for touch ups on my trim.  I liked that look much, much better.  I put several coats of white.

Chalk paint.  Yuck.
 

Semi gloss interior paint


Next I looked at my zebra canvas and copied that on both sides of the cart. 

Just before I tried the paper, see it on bar.


 Then I bought zebra wrapping paper and tried to decoupage it on the shelves, but that was disastrous.  Too flimsy; wouldn't stick, didn't go on smooth like wallpaper would have.  SO I TOOK IT OFF.  I had a carpenter over working outside, and he had seen what I was doing  While he was outside, I decided to just paint the zebra print onto the shelves like I had the sides.  I looked at the paper and my canvas while doing it.  Took about  thirty minutes.  My carpenter came in and said the paper looked good on the shelves as he saw the paper hanging off the bar.  I told him I had painted it, rather than using the paper, and he was so surprised.  He said it looked just like the paper!!  Success!

Just the top painted, but see how I tried to get stripes on sides and top to look like they are continuous.


Close up of how the zebra painting looks.


Next I painted the edges of the shelves black.

Next I spray painted two coats of clear gloss (Rustoleum brand) on all of the cart to give it shine.  Finally, I thought I was through, but someone told me they'd be interested in buying it from me if I added some "BLING".  So I went to Michaels and found some little strips of tiny rhinestones that are self sticking and came back and scattered them across the top and down the sides.  Since that day, my littlest grandson got hold of it while it was holding my t.v. in the converted garage I stayed in while remodeling the house in San Antonio, and picked some of them off before I saw him, so it is now missing some of the rhinestones, and if I ever decided to sell it; I'd have to get some more and put on it.  I never did send the new picture of it with rhinestones or bling to the lady.  I think I just wasn't ready to part with it.
This is it in the converted garage I lived in while remodeling it. 


Black front


All in all, I probably spent less than 3 hours working on this project; one of the quickest and cheapest I've done.  I got the book cart for $15 and I used paint I already had on hand.  I bought the wrapping paper and glue for decoupage, and I bought the rhinestones.  That's it.  That's all that I spent.  I think its elegant.

Friday, September 9, 2016

Pier and Beam Houses and Wood Floors


Judy here.  Let's talk house foundations and floors.  Are you ready?

Back before the mid 60's most houses in USA were built as pier and beam homes.  That means that a house did NOT sit on the ground.  First the plumbing, sewer, gas lines were laid and then some piers were put up throughout the area where the house would sit and around the edges of where the house would sit they would sometimes pour concrete footings.  If you see a  house with a porch that you have to go up 3 or 4 steps to, then it's probably pier and beam.  Those houses can be picked up and moved. 

Here in Amarillo back in the late 40's and 50's there was a builder who had an assembly line for building a house.  They were assembled at the fair grounds and then taken by truck out to a lot where the piers and footings were waiting.  Since it was assembly line, almost all houses had pretty much the same floor plan.  You came into the living room from the front door, and if you walked straight through, there was a kitchen.  If you turned to the right down a hallway, there was the bedrooms and bath.  This builder always had doors for the bedrooms that slid into the wall.  He felt it left more options for placement of furniture if you didn't have to make room for an open door.    You might turn left rather than right (that's how he changed it so not all floorplans were identical, but pretty much every house was the same.  I happen to have lived in one of these homes when I first got married back in 1973. 

My ex father in law who was a dear dear man, had worked on the assembly line, and one day he marked his name on a house, and later he bought it and my first husband was raised in that house.  After his dad built a new house in the country and the house came up for rent, we rented it.  By then he had built on a step down den and another bedroom and half bath.  It had 1200 sq ft.  Most of those houses on the assembly line were about 850 to 950 sq. ft. 

So where is the beam portion.  Its wood beams running under the house attached to the piers. If a beam breaks the floor sinks in that area.  If a pier sinks, then they can come in and "shim" them higher, or even raise with jacks, like you use on your car, kind of.  If you ever watch the HGTV show about Texas Flippers you will see the Snow girls' father moving houses, and you will see them run boards under the house, and also jacking them up. 


So the cool thing about pier and beam houses:  1.  They can be moved.  2.  You can get under them to hide from tornados  (no kidding, my ex did that when a boy,  3.  The constructions of the floor was usually WOOD.  I understand that back in those days they used a certain wood and used it all up, so wood floors that are put down now, are not like those of old, and I love those of old  I have both in my present house, old and new.  The integrity of the old is so cool, whereas new wood floors, they say if you sand them 3 times, that's about all and they'll be too thin.   4.  If you get a plumbing leak, or gas leak, they can go under house and fix much, much cheaper than a foundation of concrete.  5.  If the soil moves and the house slips or moves around, it is much, much cheaper to fix those piers and beam than slab.  I'll write a blog on lifting a slab house sometime, as I have pictures from a house I had listed.  However, they squeak if any boards are loose, and you hear footsteps.  If you see the concrete broken on a pier and beam, that is not the foundation.  Piers and beams form the foundation.  Footings add balance and keep animals out.  I see tons of houses in San Antonio that have no footings, the house just setting up on concrete blocks and you could crawl under the house.

A slab house is how most new homes are built, which is concrete poured and then the walls go up over it.  Plumbing issues such as slab leaks occur, and plumbers usually have to beat out the concrete, fix the problem, and then re-pour new concrete.  If they have to dig UNDER the slab, they can charge like $200 a ft. which adds up very, very fast.  On slab houses, I suggest floating floors if you are in an area that the ground moves a lot, as tile will crack and break if the house moves.  Laminate is a good floor for slab.  The porches on slab houses are ground level, not 3 or 4 steps. 

So today I want to dwell on MY redoing old 1923 wood floors and 1950 wood floors.  Yes, I, a woman, have refinished wood floors - all by myself on one of the projects.  With the 1950 house, I had some great young men who helped me sand the floors. 

The first house I will tell you about is a house in a historical district in Amarillo that I bought for my son.  I remodeled the house to be a BACHELOR PAD, while he was in Dallas training new hires of his restaurant.  After he got back to town, he bought the house from me and moved in.  He has since married and moved out of town to teach and coach, and he rents the house out.  He says his favorite thing about the house was the original 1923 wood floors: once I re-varnished them. 

I will have pictures posted of before sanding, during the 3 passes of sanding and then during the poly application and afterward when dry.    Some of them will show blue tape on them, because I took the pictures while working on the walls and taped off the floors to protect them from paint, but let me tell you that the sander you use, will take off any paint that is on the floor, and most stains, such as doggie stains.  However, it can NEVER get out the smell of cat pee, so I don't suggest cats that are not box trained in a wood floor house. 

When you decide to redo the floors, clear it of all furniture.  Then you need a floor sander.  There are many kinds ranging in price from 1300 to many thousands of dollars.  What I do is go to a tool rental place and rent one for $75 a day.  I can get it done in one day.  They are VERY heavy so be sure you have a man or three women (kidding) with you to help load it in the pick up and get it into the house.  Of course it will roll into the house, but if you are in a pier and beam house, you have to get it up those porch steps and it is so heavy.   Also when you rent the sander, get about 5 sanding sheets per room.  Get two kinds, 20 and 80 are the numbers I use, and you can tell the difference when you feel them.  The one that is stiffer and scratchier is the one to use first; and the thinner, less scratchy one is a finishing sander.  You will use the first one to get the old dirt, topcoat and dog pee and other stains off the top.  This layer is harder to get off and might take two passes down the room to get it off.  Once you get the hard stains off, then use the other paper and go back over it to smooth out any gouges and to give a really smooth finish for the stain. 

Be sure the people show you HOW to get the sanding paper on.  This is the tricky part.  Secondly be sure there are no nails in the floor as they will TEAR up the sanding paper, and those things are NOT cheap.  You will spend almost as much on paper as you do the sander for a whole house.  You can always take extra back to the rental place when you return the sander if you get too many; it is better to have too many than having to stop and go get more. 

Once the sanding is over, clean, clean clean.  Anything like little dirt will show in your poly when dried.  So clean is very important.  Plan to keep the house OFF LIMITS for the next two days at least.  You don't want to track in dirt between coats either, so leave the dirty shoes outside on the porch.    After you get the floor clean, open the windows because the next step is stinky.

There are all kinds of products you can stain and varnish with.  Some you have to wait a long time for drying and some you have to sand in between.  I advise against those kinds.  I use a newer product that is one step.  You just roll it on with a paint roller (sheepskin) and it dries in 3 or 4 hours, and you can start early in the morning.  Put a layer on, and then shut up the house, come back 3 to 4 hours later and do another coat (which will go much faster than first coat) and then shut up the house, and come back 3 to 4 hours later and put the final coat on.  There is a pole  you can put the roller on to stay standing as you roll on the poly, but I always break them, so I'm sorry to say I put it on with me on my knees.  I have knee pads to wear, but I have ruined my right hip and walk with a limp because of all the floor crawling I've done doing this.  So if you don't want that problem,  buy several poles, or unscrew the mop or brooms you have now and use those.  When sanding and varnishing always go with the grain of the wood, NOT across it.  Also let me warn you on the poly if you overlap, it will show when dry and you'll have a line down the room.  The poly will actually darken the wood by about 3 shades.  If you want to stain the wood first for a darker color, you will have to rub that on with a rag or roll it  and let it dry and then poly or varnish it.  The three coats of varnish is so important to protect the wood floor from spills.  I like gloss.  Some people like satin.  Also get a mask to wear; you can get HIGH on the smell.

Following are pictures of two projects I've done.  First is my son's house. 
Living room prior to painting walls or doing floors.

Kitchen before I removed this backsplash painted or did floors.  Notice how dark it is under cabinets.  That was a hard job getting it off.


Living room after I painted walls and trim.  See dark spot on left of floor.  That's where a sofa had sat, and the floors not worn there. 


Kitchen after I painted, before doing floors
 
Living room one pass of sanding


Getting these dark edges off was hard and oven had to be moved.  Ouch.
Final sanding before I did edges with belt sander

Second pass, and I've already started with a belt sander to get close to walls, as big sander will tear up baseboards if you get too close.
 

Final sanding


Now I will post the pictures of the three layers of poly added.  Keep these colors in mind, as you will see a deepening of the color plus shine.
 
 One coat
 Two coats
Three coats still wet


 Kitchen when finished.

 Living room once son moved in.
 
Next I'll show you pictures of a floor as I was pulling up old carpet that 5 dogs had been living in the house.  This was a rental and I redid this house for an elderly couple, later selling the house for about $20,000 more than it would have brought with no remodeling.  We spent $7,000 on the remodel. 

 These were really nasty.

Sanding the edges with a belt sander

 This is a sanding machine.

The finished floor in a bedroom..

Finished floor in living room; this is where we were pulling up the nasty carpet.  See how beautiful they turned out.

 Don't let anyone walk on the floors with shoes for a week, socks only.  Naked feet will leave oil marks. 

I hope you enjoyed these before, sanding, and after poly pictures.  I'm sorry I don't have the brand I used, but I got it at Home Depot. 


Tuesday, August 30, 2016

My Round Book Table.

Hello, ya'll.  Yep,, that's Texas for everyone, you all.  Judy here.


I was at the Women's Center, a set of stores for raising money to support women who are abused, one day and found a rolling book shelf which looked cool.  I bought it, brought it home and painted it as a zebra print wine cart. I'm using it today at my newest flip house in the corner of the living room.  But I enjoyed that so much, I went back to the Women's Center one day with my pick up and shopped their furniture area.  Everything is donated, so everything is used--usually dated too.


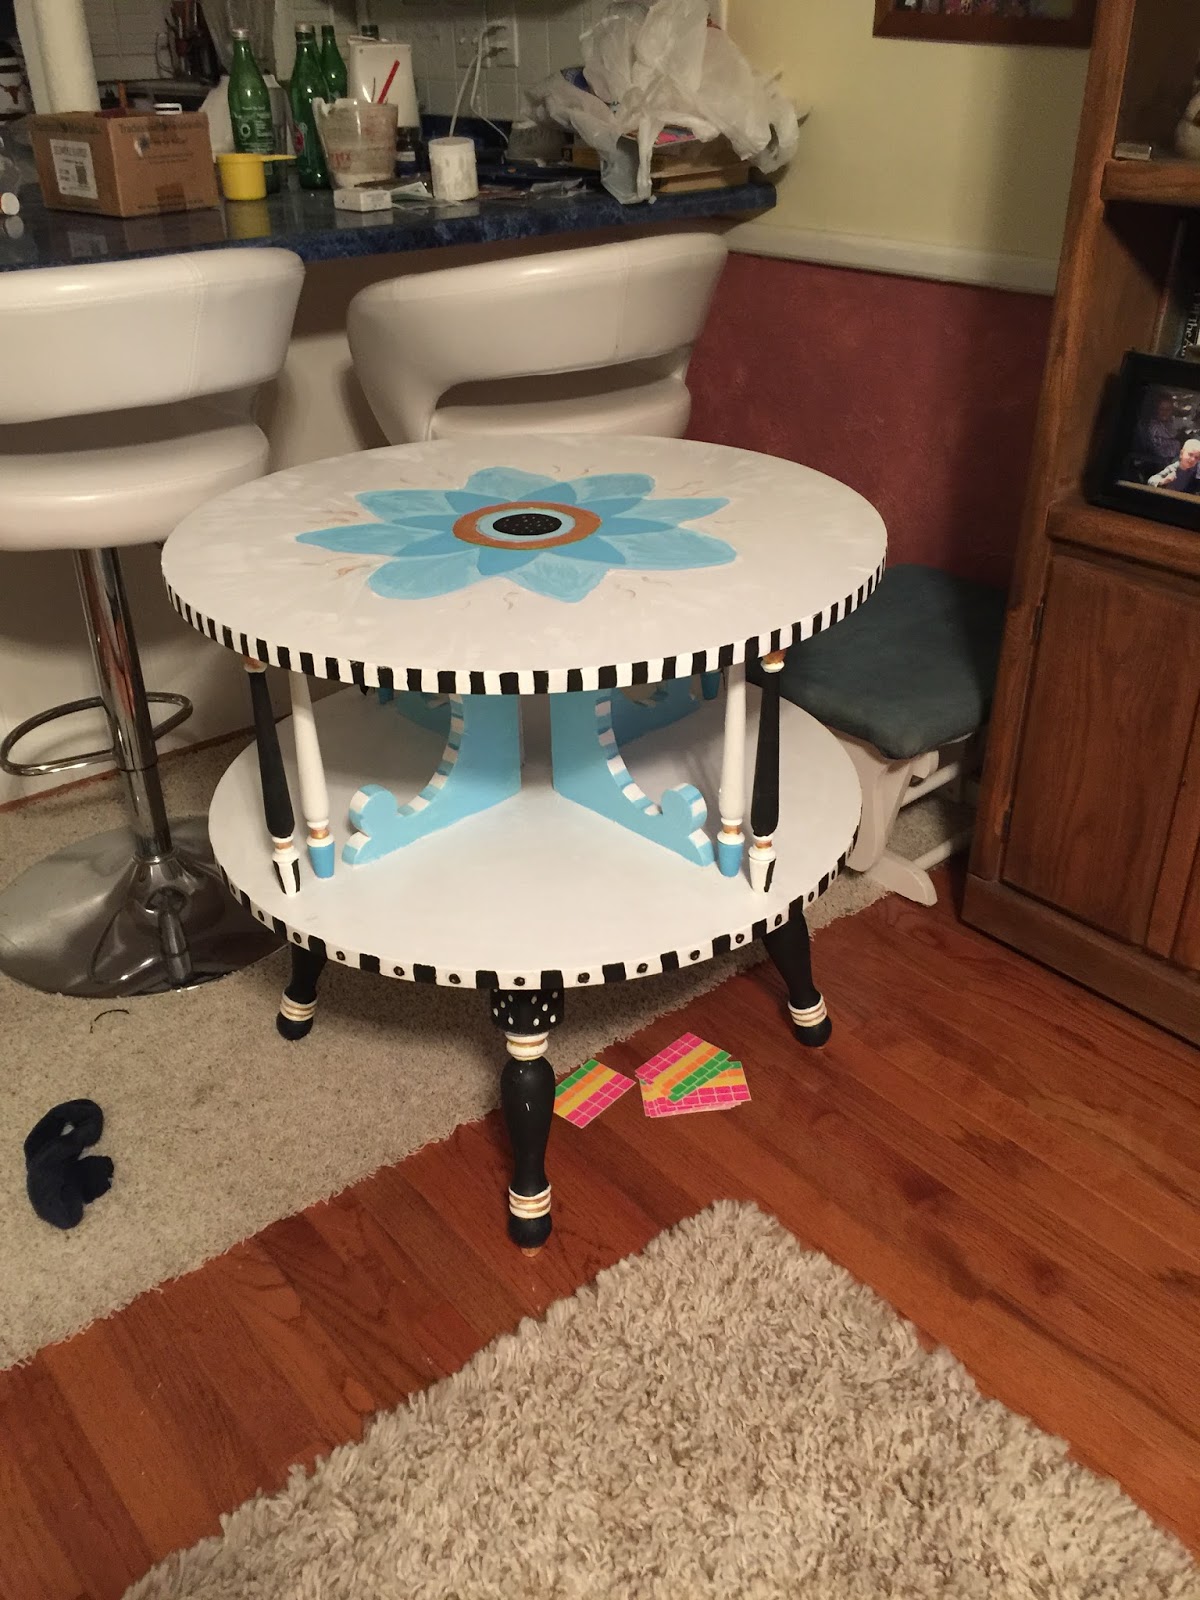
This particular day I had a ton of luck.  I found two end tables exactly like what my mom had in the living room while I was growing up.  One of these I painted as a little Diva table.  I'll post that project later.  I gave Tera the other one as she wants to make it a "block" table for her kids by putting a basket under the top shelf to hold the blocks and lower level be a building station.  I found an octagonal end table with lots of design.  I plan on making a cat house out of that, but for the time being it is living in my garage.  And the last item I bought was a piece I fell madly, hopelessly in love with.  Why?  I LOVE and COLLECT books.  I cannot stand the thought of a book being on the floor, going in a trash, etc.  This table is round, has dividers that divide the second level into four divisions, and I could just see it as a book table.  It sits up on scroll legs and I just knew FOLK ART paint was calling me, the kind with black and white checks and lots of colors.  After I flipped my first house in San Antonio (before that I worked mostly in Amarillo), I came home and attacked my staircase, living room and entry hall, while also working alternately on the round book table.  Here is what it originally looked like at the Women's Center


This is the table I made Diva and gave Tera one like it.


The first thing I did was scratch it up a little with my electric palm sander to take off the slick and make paint stick to it.  Then I used the last of my can of white chalk paint to give a rougher texture and cover some of the dark color. 


After it dried, I added over the next few days several coats of white semi gloss house paint.  My goal was to leave no sign of the brown and to have so many coats of paint it couldn't possibly chip off.  I was using Sherwin Williams interior semi gloss.  I keep cans of that in my house as I have white trim throughout and I'm constantly touching up. 


After I got all the white layers on that I wanted, then the creativity took over.  I set the table in my den across from where I sit and let it sit for several days as I looked at it while working and watching t.v. and trying to envision what I wanted.  I perused websites and blogs of other house furniture painters.  Under "My Favorites" on my computer,  I have saved The Decorative Paintbrush, a blog by two women who paint very colorful folk art designs on furniture for other people.  I can just get my artistic juices flowing looking at their pictures.  My studying similar legs, dividers, scrolls, etc., I can start getting a feel for what I want something to look like. 


I decided to work my way up from the bottom.  I decided that gold would be my shiny accent and that the legs would be black and white, alternating stripes, dots, etc.  I got these pattern ideas from The Decorative Paintbrush.  So I turned the table upside down on the kitchen counter and got out my acrylic art paints.  I get them for like $.89 a bottle at Michaels Craft Store.  I have a collection of brushes from micro tiny to tiny, to graduating upward in size.  My daughter Tera and I use to own a ceramic paint studio and I still have some of the brushes from that store.  I use a lot of blue masking painter's tape to keep lines straight and not bleed into areas I don't want painted.  Remember, acrylic will wash off if you hate what you paint, or its easy to paint over it.  As you will see from the pictures below, that I finished the legs and moved up to the dividers in the table. 


 I'm a blue person; most cars and house design I own is blue, so it should come as no surprise that I decided to do baby blue dividers.  The edges I did in stripe. I use little sticky notes from Office Depot to create the areas that will stay white.  On polka dots, I put little tiny sticky dots on the legs and painted over that area with black acrylic and then pulled off the stick dots to reveal white dots.  The gold between the scrolls of the legs was paint pens from Michaels.  On the bottom of the table is a straight area that I did stripes in two shades of blue, that remind me of a circus tent.  I just hand paint those by doing the whole area with the light blue and then taking a brush and painting downward stripes using another brush of the same size dry to mark where each stripe starts.  This is no exact painting, but the mistakes makes it more whimsical. 


 Next I did the posts between the shelves.  I decided to do exterior posts black with some gold trim, and interior posts leave white with black and blue trims.  You can use painter's tape for masking off what you don't want painted.  Also I used gold paint pen for tiny lines.  After I finished the posts I did a black and white checkered design around both shelf edges and around the edge on top of the table to make a frame.  I think it looks like a circus tent for sure now.  I put stickem strips on the edges to keep the white/white, and painted between them the black.  On the bottom shelf edge I added a black dot in the middle of the white squares to distinguish it from the top shelf.  I probably put three coats of black on the black squares to be sure its filled completely. Plus when I remove the stickems, I usually have to straighten the lines


 Sometimes I paint something like the bottom of the black posts with stripes and later decide I don't like them and change them.  So finished product may end up looking different.


After I finished the stripes I used dishes to make circles in the middle of the top of the table to form the interior of a large flower and then hand painted the flower and used acrylic mixed paints to make the petals


 After the creativity part is over, then I applied a layer of spray polyurethane. I used Rustoleums 2x Gloss which I buy at Lowes for about $3.50.   This seals that acrylic paint so that it won't run when wet and wash off.  After that dried I applied several layers of liquid polyurethane. This comes in a quart or gallon size.  I like gloss and not satin.  A quart will last a long time and do many pieces of furniture.  I buy it by the gallon when using it on flips to seal over wallpaper and do floors.  Any brand works, but be sure you are well ventilated when applying poly whether spraying or brushing as the fumes are very strong.  Also try to find some that's washable with water for your brushes or you will have to have paint thinner to clean your brushes.  If I had done this first, the acrylic would have smeared from the brushing, but the spray layer set and protected the artwork, and the three coats of liquid brushed on makes the table really, really shiny, like glass and very protected from being used by kids.  I have this setting now in front of my bay window in the dining room and it houses my grandkids blocks and books, etc.  I'll remove it at Christmas for the tree, but I just love it setting there in my "country print" dining room (which was another project). 

This was final picture with urethane applied before set on wood floor in dining room.


 By the way, I work from home a lot, so I have a printer now setting on the flower.  Oh, well, this table is doing double duty, holding a printer and housing toys and books.  As an afterthought, let me encourage you to be very, very diligent in washing your brushes.  I imagine I used up to 8 or 9 on this project and if I had not washed in between they would dry and ruin and you'd have to buy more.  This gets expensive.  I am very motivated in all projects to clean up immediately even between steps all materials, as they are costly and it is ridiculous to let good materials ruin because someone is lazy. 


Well this ends our first project post.  Hope you enjoyed it, and see you next time